 |
Installing Pathways |
Topics:
How to download and install Pathways
Pathways will run on most versions of Windows, from Windows '95 (from 1995) on to the newest version, Windows 11, with the exception of a couple of Windows Editions that are limited in what they will run, specifically: Windows RT and Windows Surface Hub.
The newest version of Pathways has a few adaptations to handle differences among these versions of Windows, so that it will run on all of them. Thanks to Microsoft's incredible backward compatibility across versions of Windows, this has been possible! So, you can run Pathways on a very old computer or a very new one, as you wish.
If you are are using Windows 10 or 11, there are some configuration settings you may need to adjust. After that, the install will be the same as on all other versions of Windows.
Special Steps for Windows 10 and 11
Windows 10 and 11 can be configured so that it will only run Windows Store apps. Pathways is available from a number of popular download sites, but not from the Windows Store. (To be offered on the Windows Store, the app must meet requirements which, unfortunately, ruin the app's backward compatability across old versions of Windows. So Pathways is currently not offerred via that Store.)
So, before installing Pathways, it's a good idea to check your settings, in order to prevent problems. Click one of these choices for instructions that include screen shots:
- Prepare Windows 10 settings.
- Prepare Windows 11 settings.
These instructions also include how to set your Windows Defender anti-virus options for Windows 10 or Windows 11.
Download and Install
Download and Run
To download Pathways, go to the download web page and click the hyperlink for the Pathways download. Your web browser will display a download notification. Here's an example of what this looks like on an Edge browser:

To keep a copy of the install program, it's a good idea to choose the "save as" option (the down-arrow next to "save" in the above example). This will let you choose where to store the Pathways installer. It is a "self-decompressing Zip file" that contains everything necessary to install Pathways. Typically you would put it in your downloads folder.
Installing Pathways is very simple. The file that you download is an install program, so you simply run it on your computer and follow the instructions that appear on your screen. To run it, view it in your downloads folder and double-click it to run.
Notifications that may appear
Depending on the version of Windows that you are running, you may see one or more of the following notifications when the installer is run. Old versions of Windows, earlier than Windows Vista, will not show any of these notifications. Here's what you may see, and what each means...
Microsoft Recommendation
If you are using Windows 10 with the Smart Screen filter with warnings turned on, you may get a notice that looks like this:
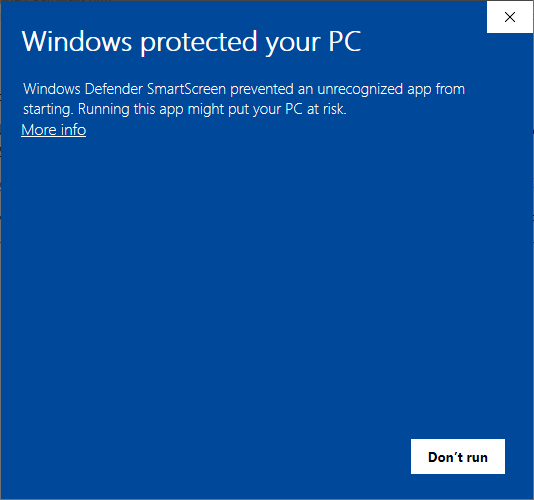
Pathways is not a major app with millions of copies downloaded that the "smartscreen filter" will recognize, so you will need to assess the app yourself. To do that, click the "More Info" hyperlink on this windows, so that this appears:
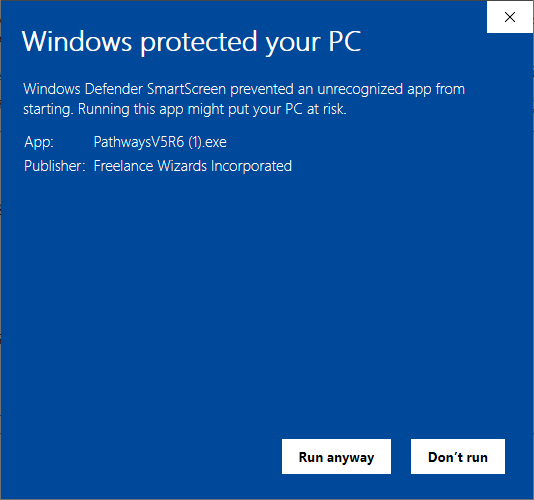
You can now see that the Pathways program is published by Freelance Wizards Incorporated. Freelance Wizards is a small firm that publishes Pathways and a few other apps. You can find out more about the publisher at its web site: www.FreelanceWizards.com or www.FreelanceWizards.ca
Pathways is also available from Download.cnet.com where you can search for "Pathways Planner," read the editor's review and user reviews of various Pathways versions.
To continue from the above window (if it appears), click "run anyway."
Publisher Confirmation
You may see this notification if you are using a newer version of Windows (from Windows Vista on up):
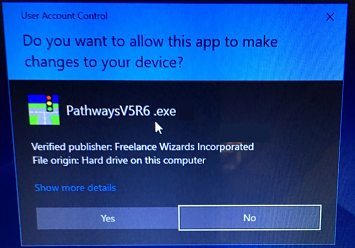
This again confirms that the software is published by Freelance Wizards Inc. (If you wish to see the details of the security certificate, proving that the software is from Freelance Wizards Inc. and that it has not been tampered with, click "show more details.") To continue the installation, click "Yes".
This starts the installer, which will guide you through the remaining steps.
Install Steps:
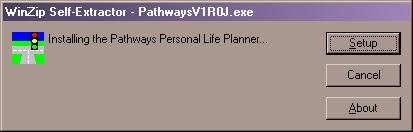
Step 1: Setup
A window will appear as follows. Click the "Setup" button to extract the necessary files and invoke the Pathways install process.
Step 2: Close Programs
A window will appear as follows to warn you to close other programs.
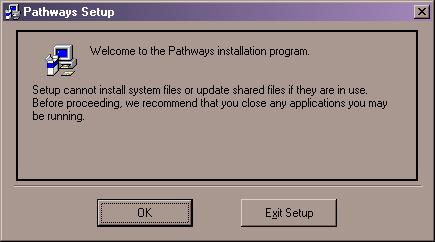
This is a recommended precaution but it is usually not essential. If you are ready to proceed, then click O.K. If you are unsure of what to do, a more detailed explanation follows here:
Pathways uses the Visual Basic V5 DLL files, which are stored in the Windows System folder. These files are shared with any other programs on your system that were written with Visual Basic V5. If up-to-date DLL files are not already in your Windows System folder, then the install program will copy new DLL files. If other programs are running that use those files, however, the installer will be unable to replace them, and the install will fail. That is why it is recommended to close other programs during the install.
If the install failed for that reason, however, you could simply close all other programs and try the install again.
Most programs that run on a typical PC do not use obsolete versions of these particular DLL files, and hence it is usually possible to install Pathways when other programs are running. If you want to leave programs running and see what happens, then just click O.K. to proceed.
To play it safe, however, you can switch to any other running program by pressing ALT-TAB and then you may exit that program. Remember that many programs require you to save files if you want to keep your work, so remember to save before closing! After you have closed any programs that you want to close, you can press ALT-TAB until the Pathways installer is again in the foreground. Then click O.K. to continue with the install.
Step 3: Begin Setup process
Next, a window will appear as illustrated here:
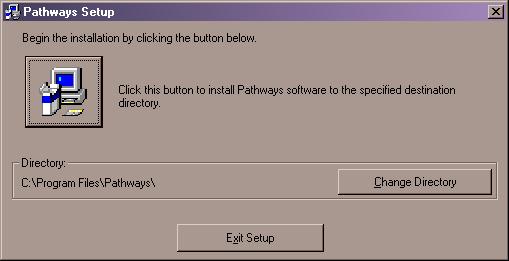
If you want to install the software into a directory (folder) other than the one named, you can click "change directory" to make some other choice. Otherwise the software will be installed in the standard location indicated. (If you are unsure of what to do, then don't click "change directory.")
To begin the install process, click the button on the upper left of the window (the button with the picture of a computer on it).
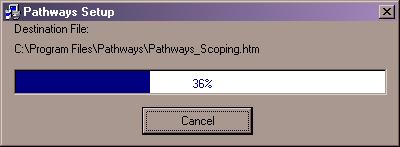
Step 4: Wait as files are installed
As files are copied, a window will appear as follows. There is nothing you need to do except wait. Usually this takes only a minute or two (or perhaps just a few seconds if you have a fast system).
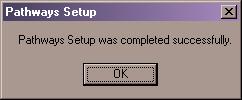
When the install completes, a message will appear and you must click OK to acknowledge that you have seen it:
Step 5: Run Pathways
Now the software is ready to use! To run Pathways, click on "Start", then "Programs", and finally "Pathways".
The first time you use Pathways, a window will appear where you are asked to accept the license agreement. Type your name at the top, because you are the licensee. When you are satisfied that you wish to accept the license, click the "I Agree" button on the license window.
Because this is the first time you are running Pathways, the program will present a window asking you where you would like the "Our Paths" folder put, which will be the standard location for Pathways data files. Choose some folder where you like to keep your files and the "Our Paths" folder will be created as a subfolder of that. Also Pathways will create an address book, "Standard.ADR" within the "Our Paths" folder.
After that, Pathways will offer to run a short tutorial to show you how to use some basic features.
How to remove Pathways from your PC
If you wish to de-install Pathways, use the Windows feature for adding or removing programs. Refer to your Windows help for the method that applies to your version of windows. Here is a brief summary:
For Windows 10, there are two kinds of apps: the "windows store" apps that are associated with the buyer, and traditional apps that will run for anyone who uses the computer. Pathways is the latter type. To remove Pathways, open the control panel and navigate to "Programs and Features". Find Pathways in the list that is presented, and click on it. Then click the "uninstall/change" choice that appears as a pop-up selection.
For Windows Vista, Windows 7, and Windows 8 the removal process is similar. Choose "Programs and Features" from the Windows Control Panel.
For older versions of Windows, click on "add or remove programs" in the Windows control panel.
NOTE: For windows 10, you won't find Pathways in the "Apps and Features" settings; those are for the Windows store apps only.
When Pathways is removed, all program and help files will be deleted. However, if you created some files using Pathways and left those in the Pathways program folder or any subfolder (such as an "Our Plans" folder that typically gets created when you use Pathways), those files will remain. In the event that you wish to delete those too, you may do so using Windows Explorer.
How to upgrade Pathways to a new version
If you wish to upgrade to a new version, the easiest method is as follows:
- Make a backup copy of your data files. This is not essential, but it is wise to have a backup copy. To make a backup, use Windows explorer to copy the "Our Plans" folder (or whatever other folder you might be using) to a memory stick, CD-RW, or other media.
- Keep in mind that new versions of Pathways are "upward compatible" with old versions. Your new Pathways will read your old Pathways files, but when a plan is saved it will be saved in the newest format. If for some reason you want to go back to an old version of Pathways, it is a good idea to have copies of the old files.
- Download the new version of Pathways, but don't install it yet.
- Remove the old version of Pathways as explained above. This will remove the old Pathways software but any plan or address files that you created will remain.
- Install the new version of Pathways. (Run the EXE file that you downloaded, and it will guide you through the installation process.)
|
|
Pathways is distributed by Freelance Wizards Inc. |