 |
Pathways Direct Run |
Downloading and Decompressing the Files
To use Pathways without installing it, you must first prepare a folder on your hard drive to put the Pathways files in. Then download the "Pathways Direct" self-decompressing zip file, called "PathwaysDirect_V6R0.exe". Put this file in the folder you created and run it. (You can run it by viewing the contents of the folder and double-clicking it.)
A window will appear similar to this one:
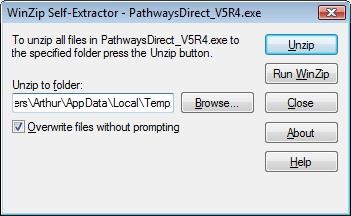
Fill in the folder where you want the files put, and click "UnZip".
The files will be copied into the folder, and finally a message will be displayed telling you that the files were unzipped. Click O.K. to acknowledge the message.
Running the software
One of the files copied into the folder is "Pathways.EXE". That is the main Pathways program. To run it, open the folder and double-click "Pathways.Exe".
When you run the program the first time, you will be required to accept a license, and the license acceptance will be stored in the same folder where Pathways.exe is found. After that, you can run any of the programs that come with pathways (any of the ".EXE" files in the folder).
When you run Pathways the first time, it creates a sub-folder to hold your data files. Pathways is configured to look in that folder for the files by default.
If you want to use the software on any computer, just copy the downloaded folder (including the sub-folder) to the memory stick. That will put all the software and your own data files (your plans, addresses, etc.) onto the memory stick. To use the software, insert the memory stick into the computer, open the folder to find Pathways.exe, and double-click it to run.
Note that when you insert a memory stick into a computer, it will automatically assign a drive letter to the memory stick. The drive letter may be different on different computers, depending on which drive letters are available. Pathways will automatically detect the drive letter so that it is the default drive for Pathways data files.
For more details about using an Pathways via a memory stick, refer to the documentation included in the online help in the "technical reference" section. (To view help, run Pathways and choose "Help" from the "Help" menu.)
Creating Shortcuts
If you will be running Pathways from the same PC regularly (for example, if you are keeping Pathways on the hard drive of the PC), then it would be handy to create a "shortcut" on your PC desktop pointing to the program. You can do this for Pathways.exe and any of the other programs that come with Pathways, such as PWAlarm.exe.
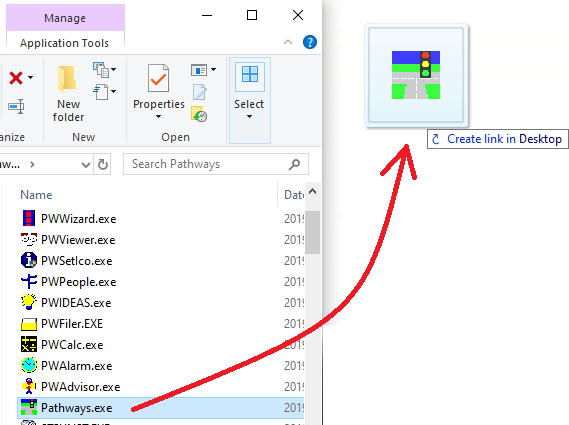
To create the shortcut, find the EXE file in the folder where you are keeping it. While viewing the file list, hold down the right mouse button and drag the file from the list to the area on your desktop where you wish to create the shortcut:
When you release the mouse button, this pop-up list will appear:
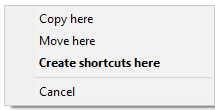
Choose "Create shortcuts here" from the pick list. That will put a Pathways icon on the screen in the position you chose. Now all you need to do to run Pathways is to double-click that icon.
If you wish to get rid of the icon, click it once so that it is selected and then press the Delete key.
Note: The above illustrations are from Windows 10 but this procedure is pretty much identical for all versions of Windows.
With Windows 10, you also have the option to put a tile for any of the Pathways programs into the start panel. Simply find the program in the list and right-click it. From the pop-up list that appears, choose "Pin to Start".
Within the start panel, you can rearrange the tiles however you wish. Click the Windows key to see the start panel, then use the mouse to drag the tile anywhere on the panel that you wish (hold down the left button while moving the mouse in order to drag the item).
With Windows 10, you also can put a shortcut in the windows task bar. The procedure is similar: find the program in the list, right-click it, and from the pop-up list choose "Pin to taskbar."
Removing Pathways
If you are running Pathways from a memory stick, then all you need to do to "remove" Pathways is exit Pathways and all accessory programs that you might be running, and then remove the memory stick.
NOTE: To ensure that the memory stick is not in use before you remove it, newer versions of windows will typically have a "Safely Remove Hardware" icon on the tool-bar. Click this, and Windows will check to ensure it is not in use. If the memory stick is "in use" for no apparent reason, check if there are any programs running on your computer that use Visual Basic V5 runtime libraries and close those programs.
IF you are running Pathways from a hard drive, to remove the software first make sure that it isn't running (close all programs) and then delete the folder where you put the Pathways software. One caution: if you are keeping your data files in a sub-folder, that would delete those too. If you want to keep the files, keep a copy elsewhere.
Also, if you created a short-cut to the software using Windows, right click it and choose "delete" from the pop-up list.
NOTE that because you never installed Pathways, you won't be able to remove it using the "Add or Remove Programs" in the Control Panel. As far as Windows is concerned, Pathways is just another file--not an installed program.
What about the Windows registry?
Pathways does not alter the Windows registry, so you have nothing to clean up there. (If you had installed Pathways instead of merely running it, the installer uses the registry; however, Pathways itself does not.)
The design of Pathways intentionally minimizes reliance on external components in order to improve the reliability of Pathways. Pathways does not install any ActiveX controls or other such components. In the direct run version, the run-time DLLs are kept in the same folder as Pathways.EXE, so when you erase the folder it is all removed.